Saturday 31 December 2011

The last day of the year

Today is the last day of 2011. There's something a little special about the end of the year - the ending of one chapter and embarking into another. Of course time and years are a human construct, and years are arbitrary but easy ways for humans to define and catagorise time. Today and tomorrow won't be much different in essence, but to me it still feels like a fresh start, and I feel a little wonder at what might come this year.

Looking back at 2011 I thought I'd look at some highlights and lowlights. In November I thought of something I was 'thankful' for everyday, so of course my highlight column would be full if I included all the nuances of my life. But looking at the lowlights too, makes me appreciate the highlights even more.

Lowlights:

-Christchurch Earthquake.

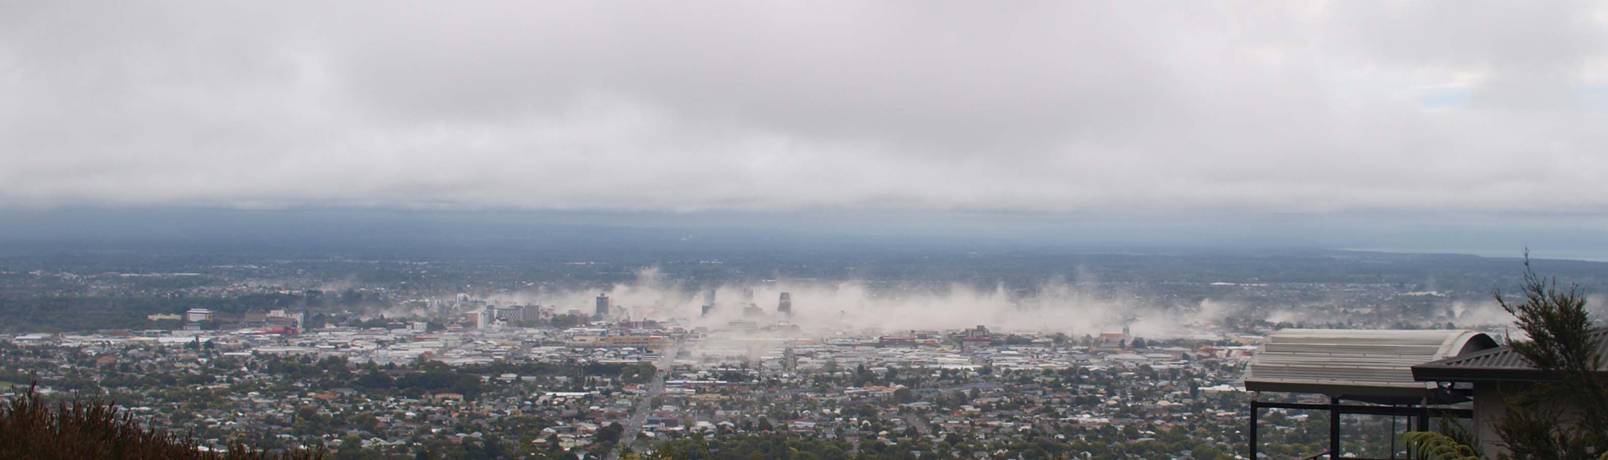
I think its obvious this was a lowlight for all of New Zealand. My sister was in Christchurch (as well as a few friends.) When I saw the footage on TV, showing all the horrific damage, I tried to contact her, and wasn't able to (for probably only around 10 minutes.) Those 10 mins of watching the terrible story unfold on TV, and not knowing where she was, were 10 minutes I would never like to repeat again. I know so many people had (/have) it so much worse, and the whole country seemed to groan in mourning at the time. This one definitely takes the cake as my lowlight of 2011.

-The result of the general election
Although, to be honest, I'm not too disappointed. NZ doesn't have it too bad. And some results were pleasing to me.

-Getting a tummy bug while camping
Bearing in mind that I only get a tummy bug about once in 5 years, it was quite unfortunate timing when I started violently throwing up in Anchorage (the Abel Tasman), with no way out except for a boat ride in the morning, with no bathroom close by, and with no chance of sleep on the rocky ground. Lets just say I am glad that experience is over. I think Matt is too.

-Dealing with Wellington drivers
Wellington drivers have a knack for driving really closely. I don't think they have ever heard of the 2-second rule down here.


-Getting an infection after getting a wisdom tooth out

After getting my wisdom tooth out I got dry socket, which lasted a few days and needless to say was the worst pain I have felt in my life so far. Luckily it coincided with snow (see below), which meant I had pretty white stuff to look at while in face destroying pain.


Highlights:

-Getting Married

This is my top experience in 2011. Getting married to my best friend was one of the best moments of my life. Asking him out in 2009 was the best move I ever made (I would like to congratulate my past self.)

-Being Married
Ok, I'll stop being all gushy soon. But being married has taught me a lot, and made me grow. There have been challenges, but so much more small joys and happiness that the challenges (so far) have been easy to overcome.

-Moving to Wellington
Moving to live in Wellington (again - last time circa 2006) has been a great move. We've made good friends here, not to mention being a lot closer to family. Now if only Wellington would have the climate of Nelson....

- Going to Nelson for Christmas
Fun was had by all.

-Snow


OMG snow in Wellington! It was crazy, it was unexpected, and it was short enough (3 days) to ensure it wasn't a pain in the..... (unlike my tooth. See above.)

Learning how to cook/bake


Thanks to cookbooks/Matt/the internet/spare time, I have learnt a bit more about baking and cooking. I have also been asked if I am pregnant many times, because of my newly acquired podgy belly. Coincidence...?

***

2011 has been a great year, but it has had it's moments, especially for the people of NZ. So I thought the following pic was apt:

2011, for me, you have been great. For others, not so much. Bring on 2012!

I hope your New Years celebrations are as wonderful as you are

xo


Thursday 15 December 2011

Easy Holiday Hair-do's with tutorials

Its christmas time, which means many parties, and get togethers over the next month. If you want to do something a bit different with your hair, that isn't too much work, have a look at these hairstyles.

The Dutch Braid:


Basically you just do a full dutch (underneath) braid down your hair, and then pin it into a mini bun at the end. Make sure to pull the braid out at the end to give it lots of volume. Full tutorial here


The tucked under braid:


For this, do a loose french braid, with only about 4-5 braids.  Braid it the whole way, then carefully tuck and pin  under the end of the braid. This works best for meduim hair length.

The Hairbow:

As seen on a previous blog entry, tutorial here

Twist and Pin


You twist sections of hair and pin them up. Video tutorial here

Massive Bun:


I'm finding this harder to do now my hair is getting longer, so I think this is perfect for mid length hair. Tie hair up in a ponytail. Then take sections and pin them back up and round. Tutorial here

Piled and Pinned Updo:


This is so easy, and great because it is naturally messy meaning you don't have to be a pro to make it look good. You section your hair into three vertical parts and starting from the bottom, pin the hair messily up. Do as much 'poof' as you like with the front. Full tutorial here

Loose front Braid:


Part you hair so you have a side part. On the side with the bigger part do a french braid or a fishtail braid down to around your ear. Pin the hair in place and use a nice clip if you want. Leave your hair out. Perfect for keeping the hair out of your eyes.

Three twisted Buns:


Those two are the same hairstyle, one with the buns down the bottom and one with the buns in a vertical row. The buns are sections of your hair twisted and pinned. Full tutorial here

And there you have it!
I would recommend you buy this e-book and this e-book. They are both about $5 and so worth it for all the step-by-step tutorials and hair inspirations. Also, have a look at this you-tube channel


Monday 12 December 2011

Pink Ombre Cake Tutorial + Gratuitous cake photos

So I was asked to make a cake for my niece's 4th birthday, a banana cake was asked for. But of course me, being me, I could not leave it at that. I set myself a goal so high I almost didn't pass, but I think I scraped on through. I wanted to make this: (a slightly lofty goal for a non-baker.)


This cake is a labour of love. Don't expect to finish it in an hour or so. It takes a few hours. It's not so much hard as it is time consuming. P.S you will need a LOT (like 1.5kg) of icing sugar for this, and a lot of cream cheese (2 tubs - you could do a plain butter icing though).

I didn't use the recipe recommended by them, I found an easier one.

Double/Triple this for this cake;

1 and a half cups of Self Raising Flour
1 cup white sugar
1/2 cup of milk
2 eggs
125g (4 oz) butter, melted
1 tsp vanilla extract.

Mix all the ingredients together, then divide into four bowls


Now the fun starts!


Add the pink gel food coloring, starting with the palest layer, and add only a touch. Add a bit more to each one until you have four different pink shades


If you are lucky, you have more than one baking pan the same size. If not, like me, you will have to cook each one individually for about 15 mins each at 180 degrees. Allow time for the cake to cool, then move to a cooling rack, before cleaning the pan and doing the next layer


Once all four layers are cooked and cooled, you need to assemble them, from darkest to lightest. You need to make all the cakes flat, so cut the tops off them with a bread knife (except the topmost one.) To stick them together use a batch of this cream cheese icing (or you could use plain butter icing);

Vanilla Cream Cheese Frosting
½ cup (1 stick/8 Tablespoons) butter (set at room temp about 10 minutes, but should still be cool)
8 oz. cream cheese (directly from fridge)
1 teaspoon vanilla extract (always use pure vanilla extract if possible)
4 cups powdered confectioners sugar
1 to 4 Tablespoons heavy cream, heavy whipping cream (or milk- although I do like the richness that cream adds)

Directions:
*Place butter in a large mixing bowl and blend slightly. Add cream cheese and blend until combined, about 30 seconds.
*Add vanilla extract and powdered sugar and blend on low speed until combined. Increase to medium speed and beat until it begins to get fluffy.
*Slowly add the heavy cream, a little bit at a time until desired consistency is met. (Don't add too much if you want the frosting to stay in place when piped on cupcakes.)
*Beat until fluffy, about 1 minute.

(I did all of this by hand, don't worry about a mixer)

Then assemble!

One you have done this you will need to cover the cake in a 'crumb layer' - a thin layer of the same icing:


Then make another batch and a half of icing. As with the cake mixture, add colours to get four graduated colours of icing

Note: This was nowhere near enough icing

Then ice your cake! Start at the bottom and do a twirl with a 5 star tip. See here for how to. You can see my first layer on the above photo. Do three layers on the side and the lightest colour on the top. When you are finished it will look like this (or better than this, if you are a pro-icer.)


I was amazed! So happy!
But I did something bad. I did not put it in the fridge (as apparently it can dry the cake out- although this cake is so covered in icing, I don't know why I thought it would effect this cake.)

Anyway, I put it in the bathroom for the night as this was the coolest room in the house. Unfortunately disaster/heat/gravity ensued and by the time we can back that night half of the side icing had come off!! Horror! I did not have the spirit to re-ice in graduated colours, so I just mixed all the fallen icing back up, and iced it to a mid pink colour.

The final cake

Oh well. I don't think Sadie minded, or even noticed :)


Cake innards


All in all, a lovely cake!


Sunday 11 December 2011

Hair Tutorial: Tucked under braid

Here is a really easy hairstyle, that is perfect for a summer night out


It's a french braid with the ends tucked under. 


So all you need to do is a real loose french braid, and braid it about 4-5 times only. Then tie it off. Then tuck the end under and pin it up


Here is where I found this idea. Its easy to do with medium length hair. You could do a big 'poof' at the front if you're doing it for a night out.


Tuesday 6 December 2011

Living for the Weekend

I have noticed a popular theme in Kiwi culture- that of 'living' for the weekend. People can't wait to leave work for two days of pure bliss - freedom! I can understand that. I love the weekend too, especially the Saturday sleep in's, and time with Matt and family and friends.

However over the years I have been perturbed at the ongoing persistence of this idea of living for the weekend. The weekend is only two days out of seven. If you are living five of those days longing for the latter two, then are you really living life? Or are you always longing to be somewhere, something different? If you can't be satisfied during the week, during your job or your studies, then what is the point? Seriously. You will be working for most of your adult life. If you can't enjoy the week, if you are always yearning for the weekend, then you will be living most of your life in misery.

I see the working week as my time to do what I am skilled in and passionate about. I aim to keep improving and giving my best to what I do. I aim to build relationships and take enjoyment from the small things in my day -small chats, funny comments, lunch in the sun, a snatched morning coffee, a job well done, a job not so well done but learned from and so on.

I aim to be positive about and enjoy my days. I think Mondays are just as valuable as Saturdays, if not more. Mondays are days I can have an impact, where I can be effective and do what I am made to do, wheras Saturdays are more about me - not as important.

This might be easy for me to say as I have a job I really enjoy. But this philosophy is one I apply to my whole life. For example, when I was single, I tried to really enjoy and soak in my days, to live and love the moments with my flatmates, with my friends, and the things that I knew would end when I got married. And now, I can appreciate those days of my life as days lived to the full, and days where I was happy to be in the moment and not (too) focused on what was to come.

In this moment, now, we are where we are and it is our choice to enjoy it or wish for time to fly past to something else. It's our life, and we will only get this time once. Why not view things well, make change if needed and be thankful and blessed for where we are. There is no use wasting our energy yearning for things to come.... they will come. But now is now, and its the only now we have.

Stop and Smell the roses

Sunday 4 December 2011

Feelings vs Attitude


Being human and somewhat selfish, I can tend to easily feel 'put out' or 'slighted.' Or, I'm tired and something that would normally not bother me, makes me really mad. And so on. I'm sure you have had these type of insiduous, creeping 'feelings' that can make you feel sour and twist you into yourself. I was feeling a bit this way the otehr day when I read this quote by C. S Lewis:

"Don’t bother too much about your feelings. When they are humble, loving, brave, give thanks for them; when they are conceited, selfish, cowardly, ask to have them altered. In neither case are they you, but only a thing that happens to you. What matters is your intentions and your behaviour."


Wow! C.S Lewis had such wisdom and a way with words that will never cease to astound me. It doesn't matter if we have the feelings I mentioned above, we're human, we're flawed, its gonna happen. What matter is our reaction, our attitudes, and our behaviours. I have no right to project negativity on others, just because I have had a bad morning. In fact, I have no right to speak negatively to myself either. What we need to do is realise that our feelings don't define who we are, they don't have to shape our world. We are bigger than feelings, and we can respond in a way we choose. 


I think I will write this quote down and put it in my wallet. Next time I'm feeling 'off' I would do well to read this, and readjust my thinking - I am defined by more than my feelings, and I am smart enough to look objectively at a situation and respond in a more befitting way that my feelings might allow.


Thursday 1 December 2011

Hair Tutorial: Hair Bow

I love the hair bow, especially on frivolous summer evenings


1. Pull your hair up, as if to do a pony tail, on the side of your head
2. Pull all the hair through a hair tie once, and then the second time through only pull half through
3. Pull the two sides apart of the hair in the 'bun.' This is your bow.
4. Pull the remaining hair over and around and pin with bobby pins, this is the middle of the bow

And viola! 


Related Posts Plugin for WordPress, Blogger...